Benefits of Lawn Aeration

Benefits of Lawn Aeration

The best time to aerate most types of grass is during the fall. However, if spring aeration is essential, target Memorial Day for late spring tasks. By this time, weeds will have settled in but haven’t yet gone to seed. This period is also ideal for improving heavily compacted soil that hinders grass growth.

What Is Lawn Aeration?

Lawn aeration involves creating small holes or slices in the soil’s surface to enhance the penetration of air, water, and nutrients, promoting healthy grass growth

Why Lawns Need Aeration

Lawn aeration effectively counteracts soil compaction, which can render the soil nearly impenetrable. This prevents air, water, and nutrients from reaching the ground, ultimately hindering robust plant growth. Aerification facilitates the recovery of compacted soil by allowing moisture and air to penetrate.

Additionally, it promotes the development of a deeper, healthier root system and encourages microbes to break down thatch.

Benefits of Lawn Aeration

Aerating your lawn is undoubtedly a valuable investment of time and effort, as it contributes to maintaining its health. This process prevents the detrimental effects of compacted soil, allowing it to absorb nutrients and water more effectively.

  • More air exposure
  • Improved soil water uptake
  • Enhanced fertilizer usage and uptake
  • Less water run-off
  • Stronger turfgrass roots
  • Reduced soil compaction
  • Better tolerance to heat and drought
  • Increased hatch breakdown


What are the cons of lawn aeration?

The biggest con of lawn aeration is the labor. It can be a lot of work for an average homeowner because the machinery can be difficult to operate. It can also be a time-intensive process.

Request Free Estimate

15 + 10 =

Aztech Transparent logo

885 Piper Way

Sandwich, IL 60548

815.786.7647 Office

815.786.6654 Fax

Office Hours:

M-F 8 am - 4 pm

Sat 8 am - 1 pm


unilock logo

icpi logo


© 2024 Aztech Landscaping of Sandwich, IL provides landscaping services and decorative stone patios.
Popular service areas include: Lake Holiday, Oswego, Sandwich, Sugar Grove, and Yorkville. (see more areas)

website design by Willow Marketing Solutions


Glow Path Technology™

Glow Path Technology™

New possibilities for outdoor design with the most recent addition to our landscape product line, concrete pavers with Glow Path Technology. The pavers’ cutting-edge luminescent technology absorbs sunlight to produce a subtle glow that lasts up to eight hours. Applications for pavers with Glow Path Technology are unlimited, including improving visibility and enhancing ambiance in outdoor entertainment spaces.

Benefits of Glow Path Technology
Built-in Safety
Pavers manufactured with Glow Path Technology subtly illuminate pathways to help pedestrians safely use and enjoy outdoor spaces at night. Used in place of, or with, landscape lighting, these pavers increase safety with every step.

One-of-a-Kind Look
Pavers with Glow Path Technology are a modern, innovative concept. Home and business owners alike take notice of their distinct expression and use them in diverse applications.

Variety of Applications
Glow Path Technology can be used to elevate the appearance of any project. In residential applications, pavers can be used to create a striking poolside area, illuminated pathways, and other dimensional details. Pavers with Glow Path Technology also create inviting spaces for customers and are perfect for restaurant and bar patios in the summer months.

Long Lasting Resilience
County Materials’ (our vendor) concrete pavers are manufactured to endure the elements. Their reliable durability protects them from staining and the effects of freeze/thaw cycles and heavy wear. The units’ glow lasts up to 20 years, but the integrity of the paver itself can last for several more decades.

Size and Color Options
County Materials (our vendor) manufactures concrete pavers with Glow Path Technology in three of our paver lines. Elements Paving Stones with Glow Path Technology are available in Dream, Reflection, and Vision in 4×8” and 24×24” units. Discover Pavers with Glow Path Technology are available in Majestic and Timeless in 4×8”, 8×8”, and 12×8” units.


All info is supplied by County Materials Corp. 


Chrysanthemums 101

Chrysanthemums 101

Mums can give you color till the cold comes. 

Chrysanthemums nicknamed “mums,” are one of fall’s quintessential flowers. They’re usually the last plant to bloom before frost, ushering your garden into the big sleep of winter with a last bang of color.
There are many species of mums, hundreds of varieties, and thousands of hybrids, with blooms that can be as frilly as a cheerleading pompom or as dainty as a daisy. Mums come in a rich range of colors including white, yellow, orange, lavender, purple, red and bicolor. They’re easy-to-grow and can be used in beds, borders, and containers. They attract butterflies in the fall and make great cut flowers, lasting up to two weeks in a bouquet.

Chrysanthemums are an ancient flower, cultivated in China as far back as the 15th century. Flowers can be as small as a quarter or big as a dinner plate. They bloom in various shapes, according to variety. Mums can be flat flowers with a single or double layer of petals that look like daisies, or a mounded flower with long petals shaped like tubes or quills.
Growing Mums.  Chrysanthemums grow 1′ to 3′ tall and get 1′ to 2′ wide, depending on the type.

When and Where to Plant Mums
If you’re using a mum as a perennial, plant in early spring, or in the fall at least six weeks before the first killing frost. If you’re using chrysanthemums for a pop of fall color to boost your late season garden, plant them when they’re blooming in later summer or early fall and treat them as annuals.

Mums grow best in full sun. Give them too little sunlight, and you’ll get a weak plant that produces few flowers.
Mums are happiest in rich, well-drained soil. Add compost or other organic material to your soil when you plant to give your mum the best shot at being a strong, healthy plant.

Garden Design Suggestions

  • Mums are ideal for containers because of their shallow root systems.
  • Use those pots of blooming mums sold in the fall as annuals to replace summer annuals that are past their prime. Tuck the mums in beds, borders, or planters to keep the color coming until frost.
  • Plant them in beds or borders in the early spring or fall as perennials. They come back each fall with more flowers.
  • Plant chrysanthemums in swaths or clumps of the same color and flower type. Mass plantings are pleasing to the eye.
  • Pair them with other late-season bloomers like sedum, goldenrod, Russian sage and asters.
  • Use them in the middle of sunny borders, cutting gardens and butterfly gardens.
  • Mums contain substances that can be toxic to cats, dogs, and horses, so keep that in mind if you have pets that might munch on them.


Source

Request Free Estimate

1 + 9 =

Aztech Transparent logo

885 Piper Way

Sandwich, IL 60548

815.786.7647 Office

815.786.6654 Fax

Office Hours:

M-F 8 am - 4 pm

Sat 8 am - 1 pm


unilock logo

icpi logo


© 2024 Aztech Landscaping of Sandwich, IL provides landscaping services and decorative stone patios.
Popular service areas include: Lake Holiday, Oswego, Sandwich, Sugar Grove, and Yorkville. (see more areas)

website design by Willow Marketing Solutions


Benefits of Fall Clean Up

Benefits of Fall Clean Up

Fall is officially here!

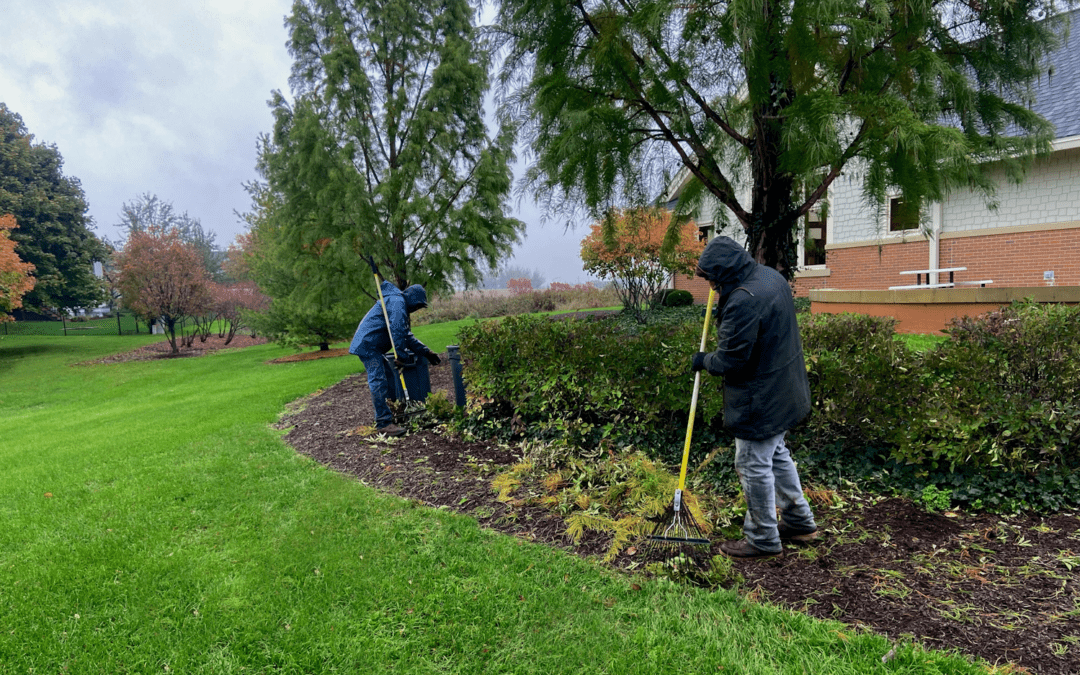
The weather is cooler, leaves are starting to fall, beautiful shades of red and orange are taking over. There are many benefits of a fall clean up. It’s the perfect time to benefit from a fall clean up, and prepare your landscape. 

Fall clean ups are very helpful in maintaining and keeping a healthy landscape. One of the most tedious tasks of clean ups is the leaf and pine needle removal. Removing leaves that have fallen from trees is recommended because lots of diseases and insects grow throughout the debris which can infect your landscaping in the long run. After the leaf removal, pruning your perennials, shrubs, and trees is the next step to your clean up.

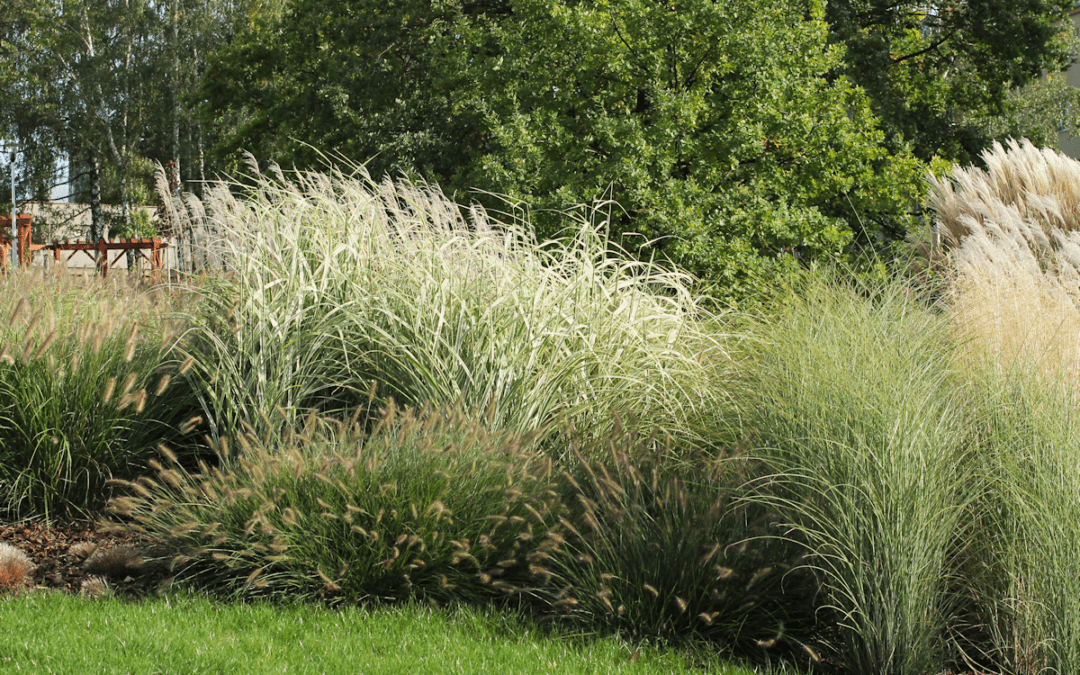
Whether you are trimming for health and stability or appearance pruning prompts new growth in the spring. Many shrubs and trees can only be pruned in the fall. Many shrubs bloom on new growth so it is very important to trim your plants in the fall. Grasses and perennials can be cut back a few inches above the ground, can provide insulation to the roots in the winter and create a clear space in the spring for new growth. 

Without the summer warmth you need to prepare your planting beds for the harsh winter weather by installing a layer of mulch. It can insulate the plant’s roots, retaining moisture and heat providing a winter cover. The mulch retains moisture and heat allowing for the microbes in the soil to live longer throughout the winter improving the soil conditions. As the mulch breaks down it releases many minerals and nitrogen that enrich the area providing healthier blooms in the spring. In the spring as you see everything start to turn green and beautiful you’ll be glad that all your hard work in the fall paid off!


Winter is the best time to plan your landscaping projects

Winter is the best time to plan your landscaping projects

Winter is the best time to plan your landscaping projects

Winter is a great time to consult with our landscape designer about the upcoming spring projects! During the winter season when everything is dormant, and our workload is somewhat reduced and is a great time to discuss your ideas!

Megan, our professional landscape designer may see solutions you never dreamed of and help you avoid costly mistakes. We can assess your property’s strengths and weaknesses, think about the ways you envision using your yard, and understand the steps involved in the landscape design process.

NOW is a perfect opportunity to think about your landscaping projects for the spring and jumpstart the process! Give us a call at 815-786-7647 

Complete the below form to request more information: 

Client Questionnaire:


We provide the perfect combination creativity and professionalism to master the outdoor setup that customers envision. We happily work side by side with clients to learn exactly what they are looking for. While also adding our professional expertise we are able to make a successful project each and every time.  Contact us.

How did you hear about us?

What area do you want us to focus on?

What type of garden are you interested in?

What level of Maintenance are you looking to have?

Are you interested in hardscaping?

Are you interested in Landscape Lighting?

Do you have pets?

Do you have any utilities you are looking to hide?

14 + 10 =

Aztech Transparent logo

885 Piper Way

Sandwich, IL 60548

815.786.7647 Office

815.786.6654 Fax

Office Hours:

M-F 8 am - 4 pm

Sat 8 am - 1 pm


unilock logo

icpi logo


© 2024 Aztech Landscaping of Sandwich, IL provides landscaping services and decorative stone patios.
Popular service areas include: Lake Holiday, Oswego, Sandwich, Sugar Grove, and Yorkville. (see more areas)

website design by Willow Marketing Solutions


Advantages of Using Pavers for Your Driveway

Advantages of Using Pavers for Your Driveway

Many homeowners are looking for ways to either increase the value of their home or increase the beauty and functionality of their forever home. In either case, improving curb appeal is the main goal. Whether your home’s driveway is cracked, dull and crumbly, or is simply looking dated, the driveway is the perfect place to start.

  1. Strength

Concrete paving stones are carefully manufactured to make them incredibly strong. In fact, paving stones are typically two to three times stronger than poured-in-place concrete. The combination of higher concrete loading per piece, and the quality control that goes into a manufactured stone means a paver is likely to have increased strength consistently throughout, whereas large, poured slabs could have inconsistencies throughout, leading to long term issues with durability.

  1. Flexibility

The method by which concrete pavers are installed leads to a natural flexibility of the surface. This flexibility allows the pavers to adjust with the freeze/thaw shift, virtually eliminating cracking, found more typically with pour-in-place concrete or asphalt.

  1. Easy to maintain

Maintaining driveway pavers is far easier and more affordable than with standard asphalt driveways. Stains and cracks that occur on asphalt can lead to costly and time-consuming restoration. These types of repairs will, more than likely, have to be done several times throughout the lifetime of the driveway. In contrast, if a paver does become damaged or stained, that paving stone would simply be removed and replaced with a new one.

  1. Easy to replace

When an asphalt or concrete driveway fails, typically the entire driveway will need to be removed and replaced. While patch work is possible, it is evident there have been patches due to color differences, leading many homeowners to replace the whole driveway. However, with paving stones, you can replace only the area that needs replacing. Replacing a paver is straightforward, does not require large, specialized equipment, can be done in a day and can even be done yourself.

  1. Style versatility

With paving stones, your design is limited only by imagination. Mixing colors and textures and laying patterns can create magnificent designs, making your driveway the talk of the neighborhood. You can select pavers to match your home’s character and color, giving your driveway a modern flair or old-world charm.

  1. Environmental benefits

Stormwater management is quickly becoming a major environmental issue affecting municipalities. In some cities, permeable paving solutions are required by law, which quickly eliminates most traditional driveway paving options. Unilock offers the widest selection of permeable paving options on the market, meaning you can meet local requirements without sacrificing your aesthetic. Learn more about the advantages of permeable paver.

  1. Quick installation

With paving stones, there is no waiting period to drive on the installed product. With asphalt and concrete, there is a waiting period before it is safe to drive on the surface. This is typically a bigger issue in urban areas where street parking is limited, or even disallowed.

If you are considering having a new concrete paver driveway installed give Aztech Landscaping & Paving a call at 815-786-7647


Source:  Unilock


Information provided by: Source

Aztech Transparent logo

885 Piper Way

Sandwich, IL 60548

815.786.7647 Office

815.786.6654 Fax

Office Hours:

M-F 8 am - 4 pm

Sat 8 am - 1 pm


unilock logo

icpi logo


© 2024 Aztech Landscaping of Sandwich, IL provides landscaping services and decorative stone patios.
Popular service areas include: Lake Holiday, Oswego, Sandwich, Sugar Grove, and Yorkville. (see more areas)

website design by Willow Marketing Solutions


Tips for Firepit in your back yard

Tips for Firepit in your back yard

Things to consider when installing a fire pit in your back yard

Few things in life can match the cozy feeling you get from the mesmerizing flames of an outdoor fire on a cool evening. Think about roasting marshmallows and warming your hands around mugs of hot cocoa. You can create that inviting experience by adding a fire pit to your back yard. Then, simply set the scene with comfy chairs, soft music and a few close friends sprinkled around.

If you are thinking about adding a fire pit to your backyard escape, there are a few things to consider before you get started.

Is it OK to have a fire pit in my backyard?

It is OK to have a fire pit in your backyard as long as you are aware of safe practices and local bylaws regarding recreational fires. In general, keep these guidelines in mind:

The fire must be a safe distance from any combustible surface. Usually, this means that the fire must be twenty-five feet from any structures such as your house, shed, vehicles or decks.
If your backyard is heavily treed, make sure there are no branches extending over the fire.
Consider how the fire affects your neighbors. Will smoke or sparks make their way into their yard or open windows? Your fire should be at least 10 feet from the property line.
Check the wind conditions. If it’s a windy evening, don’t build a fire. It simply isn’t safe for you or your neighbors.
Keep the size of your fire manageable. Fires should be no taller than three feet high and three feet wide. Anything larger poses a significant fire threat.
Make sure your fire is tended to and supervised by an adult for the entire time that it is burning.
Check the local bylaws for having outdoor fires in your community.

What is the best fire pit

The best stone for fire pits is any concrete stone paver and wall products.  Definitely avoid sandstone, limestone, pumice, and river rocks because of their porous nature and tendency to hold water. When wet rocks heat up, the trapped air and water expand very quickly and force the rock apart, sometimes causing it to explode.

How much does a stone fire pit cost?

The cost of a stone fire pit depends on a lot of different factors such as the size of your fire pit, and the products used to construct it.

Do you need special stones for a fire pit?

No, you don’t need special stones for a fire pit – but you do need a metal insert to protect the shape and structural integrity of the exterior walls.

What should I put under my fire pit?

The only thing you need under your fire pit is a level base that has approximately 8 inches of gravel.


Visit information / source provided by Unilock

Aztech Transparent logo

885 Piper Way

Sandwich, IL 60548

815.786.7647 Office

815.786.6654 Fax

Office Hours:

M-F 8 am - 4 pm

Sat 8 am - 1 pm


unilock logo

icpi logo


© 2024 Aztech Landscaping of Sandwich, IL provides landscaping services and decorative stone patios.
Popular service areas include: Lake Holiday, Oswego, Sandwich, Sugar Grove, and Yorkville. (see more areas)

website design by Willow Marketing Solutions


What’s in a Zone?

What’s in a Zone?

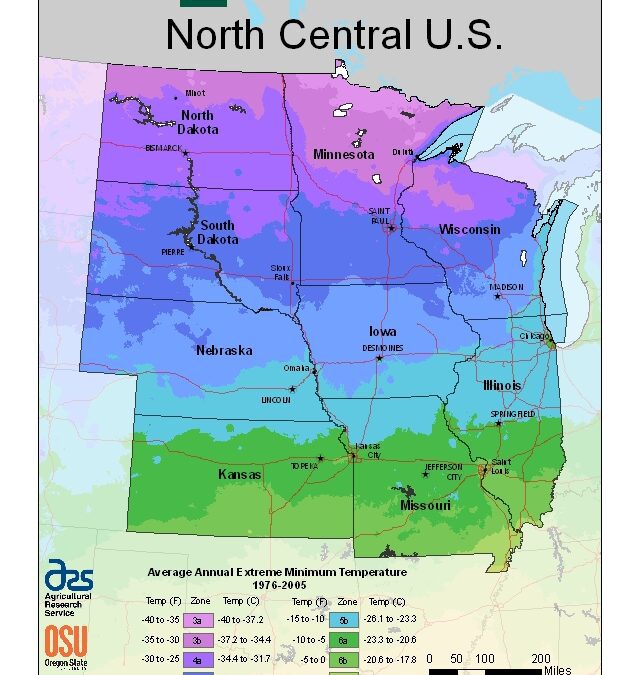
What’s in a Zone?  A landscape Zone that is …  Understanding what zoning when it comes to choosing plants or trees for your landscaping can be key. The USDA divided North America into areas, or zones, where specific plants would most likely thrive. The idea was to help gardeners compare the climate of their garden with climates where a plant grows well.  The map is based on the average minimum temperature, divided into 10°F zones. Hardiness zones are particularly informative about the extremes of winter cold.   We (Northern Illinois) are in Zone 5.

Other things to consider.

Planting based on the USDA’s hardiness map isn’t enough for a thriving garden. You must also think about things like having the right amount of sunlight or shade for a certain plant to grow, maintaining the moisture level of soil without overwatering it, giving it the right nutrients, and pruning when necessary.

If you want your plantings to flourish every year, they must be able to tolerate year-round conditions in your area, whether they’re high or low temperatures.

Working with a professional landscaper can be helpful when devising a plan that meets your needs for your home or business landscape.


Need a Landscape Design, Hardscape or Maintenance?

Send Request for More Information:


Aztech Transparent logo

885 Piper Way

Sandwich, IL 60548

815.786.7647 Office

815.786.6654 Fax

Office Hours:

M-F 8 am - 4 pm

Sat 8 am - 1 pm


unilock logo

icpi logo


© 2024 Aztech Landscaping of Sandwich, IL provides landscaping services and decorative stone patios.
Popular service areas include: Lake Holiday, Oswego, Sandwich, Sugar Grove, and Yorkville. (see more areas)

website design by Willow Marketing Solutions


What is the difference between annuals and perennial?

What is the difference between annuals and perennial?

What is the difference between annuals and perennial?  The short answer is that annuals don’t come back, but perennials do.

Perennials are plants that can survive in the garden for at least two growing seasons. They die back in the winter and then, as if by magic, they return lush and renewed, ready for another go at life. These plants manage to survive because their roots can weather the winter climate in their growing zones. A garden filled with perennial plants is a lot less work than one that’s mostly annuals. While there’s still work to be done in a perennial garden—pruning and weeding, for example—there’s no need to replant everything each year.

The secret to a stunning perennial garden is to choose varieties that bloom at different times, which ensures that your yard will pop with color in different season.

While annuals live for only one season, they tend to have a long bloom season. They are usually bright and showy, used by gardeners to add burst of bright color to their flower beds and container gardens. A good example of an annual flower are chrysanthemums.


Information provided by: Source

Aztech Transparent logo

885 Piper Way

Sandwich, IL 60548

815.786.7647 Office

815.786.6654 Fax

Office Hours:

M-F 8 am - 4 pm

Sat 8 am - 1 pm


unilock logo

icpi logo


© 2024 Aztech Landscaping of Sandwich, IL provides landscaping services and decorative stone patios.
Popular service areas include: Lake Holiday, Oswego, Sandwich, Sugar Grove, and Yorkville. (see more areas)

website design by Willow Marketing Solutions


Learn About Hostas

Learn About Hostas

Botanical Names: Hosta, astilbe, golden hakone grass (Hakonechloa macra ‘Aurea’), lungwort (Pulmonaria), Siberian bugloss (Brunner macrophylla)

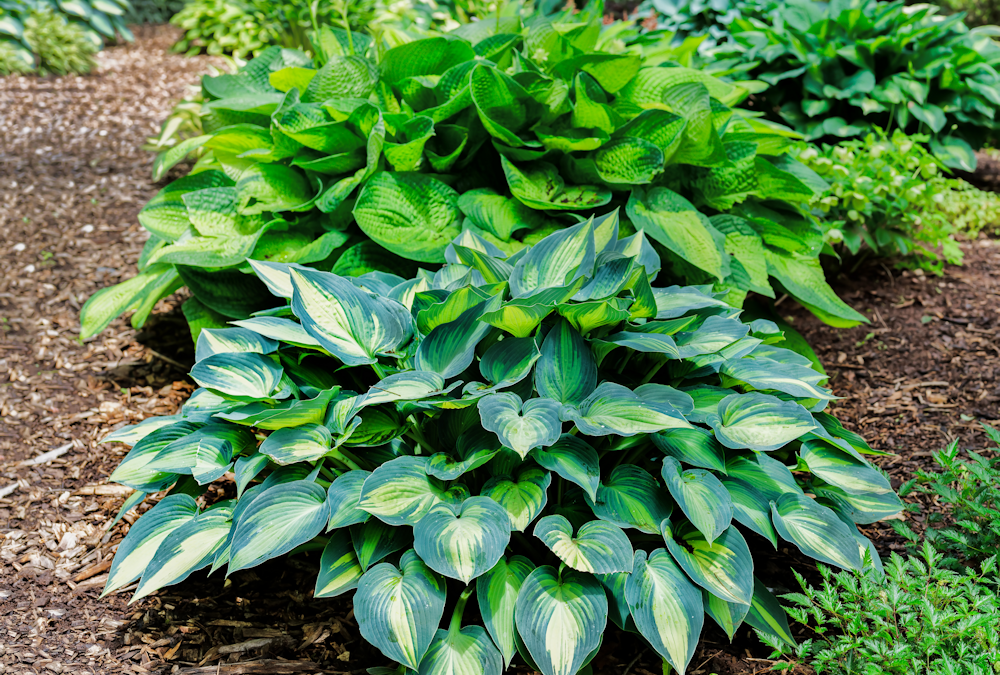
Splash some color into your yard’s shady corners by planting hostas. These leafy plants are perennial favorites, and growing hostas isn’t reserved for experienced gardeners. Learning how to grow hostas isn’t difficult — it’s actually one of the easiest perennials to tend. Glean some tips on when to plant hostas, how to plant hostas and what to plant with hostas.

Not sure when to plant hostas? The good news is that timing isn’t too critical. Most gardeners tackle planting hostas in the spring or fall. In spring, you can plant bareroot or potted hosta plants. Be sure soak bareroot hostas in water for a few hours before planting. For fall planting, you’ll probably use potted hostas. You can often find potted hostas on discount at garden centers in early fall. The trick with fall-planted hostas is timing. Aim to be planting hostas several weeks before the soil freezes. This gives plants plenty of time to sink roots before harsh weather arrives.

It’s not challenging to learn how to plant hostas. Start by determining where to plant hostas. Most hostas like shady conditions, but newer sun tolerant hostas can withstand morning or, with some varieties, all day sun. Start planting hostas by digging a hole and adding organic matter. Compost, composted manure, ground tree bark or other locally available materials provide ideal sources of organic matter, which helps soil retain water so it’s readily available to plant roots.

Dig planting holes that are wider than deep. Hostas aren’t especially deep-rooted but do tend to extend roots out to the edges of leaves. Make your hole wide enough so that roots fit without being folded. Tuck the hosta into the hole so that it sits at the same depth it did in the pot. Backfill the hole, and cover the bare soil with mulch.

One common problem gardeners find when growing hostas is that small critters like voles can cause serious damage to plants over winter. When adding mulch to cover soil, don’t pile it against hosta plant stems because this can trigger fungus diseases to attack leaf stems. You also don’t want to add a thick layer of mulch, which gives voles a place to tunnel and hide. Instead, add a 1- to 2-inch-thick layer, keeping it pulled back from the crown of the plant.

As you choose what to plant with hostas, you might consider traditional partners, like lacy ferns, astilbe and golden hakone grass (Hakonechloa macra ‘Aurea’). These plants unfurl leaves that provide a feathery, lacy textural contrast to the broad leaves of hosta plants. Other perennials that pair well with hosta include variegated cultivars of plants like lungwort (Pulmonaria) and Siberian bugloss (Brunnera macrophylla).

How often you need to transplant hostas varies. As a rule, hostas tend to grow bigger the longer they stay in one spot, so if you’re wanting a substantially sized plant, avoid frequent transplanting. If a plant has outgrown its place, then you should consider transplanting.
Some hosta varieties perform like many clump-forming perennials, with older plants dying out in the center of the clump. In this situation, new growth occurs along clump edges. This new growth is often individual small plants ideal for transplanting.
Usually transplanting hostas is easy and relatively quick. Take time to prepare the soil in the new planting area. Mix in plenty of organic matter to create a soil base that’s rich and drains well. For organic matter, use compost, ground tree bark, composted manure or any other material that’s locally available to you.
When transplanting hostas, you want to get as much of the root ball as you can. This is especially important with larger plants. Start digging the plant by inserting your shovel into soil just outside the edge of the leaves. Roots typically extend this far. Insert the shovel all the way around the hosta, forming a circle. Pry the plant out of the ground. With really large plants, roots may extend up to 18 inches deep.


All data herein is for information purposes and gathered from an outside source.

Need a Landscape Design, Hardscape or Maintenance?

Send Request for More Information:


Aztech Transparent logo

885 Piper Way

Sandwich, IL 60548

815.786.7647 Office

815.786.6654 Fax

Office Hours:

M-F 8 am - 4 pm

Sat 8 am - 1 pm


unilock logo

icpi logo


© 2024 Aztech Landscaping of Sandwich, IL provides landscaping services and decorative stone patios.
Popular service areas include: Lake Holiday, Oswego, Sandwich, Sugar Grove, and Yorkville. (see more areas)

website design by Willow Marketing Solutions


Call Us NOW at 815-786-7647